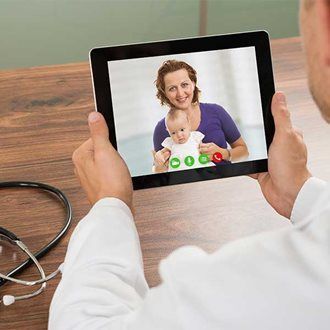
Virtual Visits
What Are Virtual Visits?
Virtual Visits are a convenient option which allows your child to be seen without coming into our office, and provides care by us, your regular pediatrician, who knows your child’s full history, and has access to their medical chart.
Although virtual visits may be appealing, they are not for all conditions. This is especially true for Pediatricians. It is challenging to get a good visual exam on a busy toddler, to assess breathing without a stethoscope and to evaluate a rash with poor video resolution. If the rash is of an infectious nature, we cannot culture it virtually. Therefore, there are very few medical indications that qualify for a virtual visit.
PLEASE REVIEW OUR VIRTUAL VISIT POLICY HERE.
How does a visit work?
We use a vendor called Remedy Connect. We will send you reminders preceding your appointment but on the day of your appointment you will receive a text link ten minutes prior to the appointment. Please follow this link and prepare accordingly by:
- Closing all other apps
- Allowing access to your camera and microphone
- Ensuring a good WiFi connection
- Assure your phone has the latest Operating System
Our staff will likely use the chat function to confirm you are in the virtual waiting room and the physician will connect with you momentarily. Please maintain the connection to minimize having technical issues. If you have a virtual appointment with one of our Dietiticians please find instructions by clicking here.
Before Your Appointment
- Take close-up photos of any rash.
- Write down all of the medicines your child has been taking, and when they last took a dose of ibuprofen or acetaminophen.
- Have current medications or inhalers/spacers available for viewing during the visit.
- Write down any questions you have, as you might forget them during the telemedicine visit!
- Review our Virtual Visit Policy HERE
Acute Care
We can provide care for most of the following acute care concerns:
- Pinkeye without fever in children over 2
- Allergies
- Minor traumas (lacerations, abrasions) - often just a determination whether it needs to be stitched or not
- Assessments for those with travel constraints
- Breastfeeding support
- Nutritional consultation and support in some instances
- Care management and medication management for Asthma, Depression, Anxiety and other Mental Health conditions
It is also possible that after video-conferencing, we may ask you to bring your child to the office for an in-person visit if we need to perform a physical exam that reaches beyond the abilities of video conferencing.
Behavioral and Mental Health
The majority of our telehealth appointments are for behavioral and mental health concerns – both initial evaluations and follow up care as appropriate.
- Care management and medication management for ADHD
- Care management and medication management for Anxiety or Depression
Appointments for telehealth visits can be made through our front desk for chronic care management or through our phone nurses for acute care concerns. As of April 2021, some insurers may not cover telehealth appointments. Please contact your insurer to confirm coverage prior to booking an appointment.
Nutrition Visits
Nutrition Virtual Visits are held on a different platform called Care Convene. For details click here.
How Do I Take a Temperature?
When Does Your Child Have a Fever?
- Rectal, Forehead or Ear temperature: 100.4° F (38.0° C) or higher
- Oral (mouth) temperature: 100° F (37.8° C) or higher
- Under the arm (armpit) temperature: 99° F (37.2° C) or higher
- Caution: Ear temperatures are not accurate before 6 months of age
Where to Take the Temperature
- Rectal temps are the most accurate. Forehead temps are the next most accurate. Oral and ear temps are also accurate if done properly. Temps done in the armpit are the least accurate. Armpit temps are useful for screening at any age.
- Age under 3 months old (90 days old). An armpit temp is the safest and is good for screening. If the armpit temp is above 99° F (37.2° C), re-check it. Use a rectal reading. Reason: If young babies have a fever not caused by recent vaccinations, they need to see a doctor now. New research shows that forehead temps may also be accurate under 3 months of age.
- Age 3 months to 4 years old. Rectal or forehead temps are accurate. An ear thermometer can be used after 6 months old. An armpit temp is good for screening if it is taken properly.
- Age 4 years and older. Safe to take the temp orally (by mouth). Ear and forehead thermometers are also good.
- Digital (electronic) thermometers are easily found in stores. They do not cost very much. They can be used for rectal, armpit and oral temps. Most of them give an accurate temp in 10 seconds or less. The AAP suggests you replace any glass thermometer in the house with one of these products.
Rectal Temperature: How to Take
Age: Birth to 4 years old
- Have your child lie stomach down on your lap. Another way is on the back with the legs pulled up to the chest.
- Put some petroleum jelly on the end of the thermometer and the anus.
- Slide the thermometer gently into the anus no more than 1 inch. If your child is less than 6 months old, put it in no more than ½ inch. That means until you can no longer see the silver tip.
- Be gentle. There should not be any resistance. If there is, stop.
- Hold your child still. Leave a digital thermometer in until it beeps (about 10 seconds).
- Your child has a fever if the rectal temp is above 100.4° F (38° C).
Armpit Temperature: How to Take
Age: Any age for screening
- Put the tip of the thermometer in an armpit. Make sure the armpit is dry.
- Close the armpit by holding the elbow against the chest. Do this until it beeps (about 10 seconds). The tip of the thermometer must stay covered by skin.
- Your child has a fever if the armpit temp is above 99.0° F (37.2° C). If you have any doubt, take your child's temp by rectum or forehead.
Oral Temperature: How to Take
Age: 4 years and older
- If your child had a cold or hot drink, wait 30 minutes.
- Put the thermometer under one side of the tongue towards the back. It's important to put the tip in the right place.
- Have your child hold the thermometer with his lips and fingers. Don't use the teeth to keep in place. Keep the lips sealed until it beeps (about 10 seconds).
- Your child has a fever if the temp is above 100° F (37.8° C).
Digital Pacifier Temperature: How to Take
Age: Birth to 1 year. (only good for screening - requires the baby to suck on it, which is not always possible)
- Have your child suck on the pacifier until it beeps (about 10 seconds).
- Your child has a fever if the pacifier temp is above 100° F (37.8° C).
Ear Temperature: How to Take
Age: 6 months and older (not accurate before 6 months)
- This thermometer reads the heat waves coming off the eardrum.
- A correct temp depends on pulling the ear backward. Pull back and up if over 1 year old.
- Then aim the tip of the ear probe between the opposite eye and ear.
- Parents like this thermometer because it takes less than 2 seconds. It also does not need the child to cooperate. It does not cause any discomfort.
- Caution. Being outdoors on a cold day will cause a low reading. Your child needs to be inside for 15 minutes before taking the temp. Earwax, ear infections and ear tubes do not keep from getting correct readings.
Forehead (Temporal Artery) Temperature: How to Take
Age: Any age
- This thermometer reads the heat waves coming off the temporal artery. This blood vessel runs across the forehead just below the skin.
- Place the sensor head at the center of the forehead.
- Slowly slide the thermometer across the forehead toward the top of the ear. Keep it in contact with the skin.
- Stop when you reach the hairline.
- Read your child's temp on the display screen.
- Note: some newer forehead thermometers don't need to slide across the forehead. Follow the box directions on how to take the temp.
- Used in more doctor's offices than any other thermometer.
- Parents like this thermometer because it takes less than 2 seconds. It also does not need the child to cooperate. It does not cause any discomfort.
- Caution: Forehead temperatures must be digital. Forehead strips are not accurate.
Copyright 2000-2020 Schmitt Pediatric Guidelines LLC
How Do I Measure a Respiratory Rate?
Set a timer for 30 seconds and count the number of times your child’s chest rises. Double that number to get his respiratory rate. If your baby or has any of the following symptoms, it could mean he’s having trouble breathing- please call us or 911 immediately:
- Bluish color around the mouth
- Pale or gray skin
- A grunting sound with each breath out
- Nose flaring
- Significant wheezing
- Upper chest sinks in with each breath
Trouble breathing is accompanied by poor feeding. If your child is "eating like a champ" they are likely just a "noisy breather". Call and discuss with a phone nurse to determine if your child needs an urgent appointment.
How Do I Take a Pulse?
To take your child's pulse, you will need a watch with a minute hand or stopwatch app (easier) with the minutes and seconds displayed. Find a quiet place where your child can sit or lie comfortably.
If your child has just been active (running, jumping, crying, etc.), wait at least 5 minutes to allow the heart time to slow down and return to a normal beat.
To feel a pulse, you press two fingers — your index ("pointer") and middle fingers — onto a major artery in the body. Press gently. Never press with your thumb, as it has a pulse all its own and can throw off a reading. When you've located the pulse, you will feel a throbbing sensation.
There are several areas on the body to read a pulse, but in kids these are generally the easiest places:
- On the neck (carotid artery pulse). The carotid artery runs along either side of the throat (windpipe). Run your fingers about halfway down the neck and press gently to the left or right side of the windpipe (carefully avoiding the Adam's apple in teen boys). Press gently. You should feel the pulse. If not, try again or on the other side.
- On the wrist (radial pulse). This is the spot where most adults have their pulse taken. It can work well in kids, too. To find the right spot, place a finger at the base of your child's thumb and slide it straight down to the wrist. On the wrist, press gently to feel for the pulse. This works best if your child's hand is lying flat or bent slightly backward.
- In the armpit (axillary pulse). Press your fingertips into the armpit, feeling around for the arm bone. When you feel the arm bone beneath your fingers, you should also feel the pulse. This method works well for infants.
- In the crease of the elbow (brachial pulse). This location works best for infants. Place your infant on his or her back with one arm flat along the baby's side (elbow crease facing up). In the crease of the elbow, gently place your fingers on the inside of the arm (the pinky side). Feel around for a pulse. Once you've located the pulse (feeling a "throbbing" or "beating" sensation on your fingers), begin counting the beats within a 30-second timeframe. After 30 seconds, stop. Take the number of beats (for example, 45 beats in a 30-second period) and double it.
So:
- 45 x 2 = 90 beats per minute. The heart rate for your child would be 90, which is within the normal range for most kids. (This is just an example; your child's heart rate may be different.)
If you don't feel comfortable taking a pulse this way, or have difficulty, there is another option. Many smartphone apps and Apple watches can give pulse readings simply by pressing a finger over the camera lens or watch. For a good reading, your child needs to be very still, so this method works best in older kids who are more cooperative.
How to Accurately Measure your Child
CDC Guidelines for Measuring Children's Height & Weight Accurately at HomeTo measure height accurately at home:
- Remove the child or teen’s shoes, bulky clothing, and hair ornaments, and unbraid hair that interferes with the measurement.
- Take the height measurement on flooring that is not carpeted and against a flat surface such as a wall with no molding.
- Have the child or teen stand with feet flat, together, and against the wall. Make sure legs are straight, arms are at sides, and shoulders are level.
- Make sure the child or teen is looking straight ahead and that the line of sight is parallel with the floor.
- Have your child take a breath and hold it.
- Take the measurement while the child or teen stands with head, shoulders, buttocks, and heels touching the flat surface (wall). Depending on the overall body shape of the child or teen, all points may not touch the wall.
- Use a flat headpiece to form a right angle with the wall and lower the headpiece until it firmly touches the crown of the head.
- Make sure the measurer’s eyes are at the same level as the headpiece.
- Lightly mark where the bottom of the headpiece meets the wall. Then, use a metal tape to measure from the base on the floor to the marked measurement on the wall to get the height measurement.
- Accurately record the height to the nearest 1/8th inch or 0.1 centimeter.
Home to Accurately Weigh your Child
- Use a digital scale. Avoid using bathroom scales that are spring-loaded. Place the scale on firm flooring (such as tile or wood) rather than carpet.
- Have the child or teen remove shoes and heavy clothing, such as sweaters.
- Have the child or teen stand with both feet in the center of the scale.
- Record the weight to the nearest decimal fraction (for example, 55.5 pounds or 25.1 kilograms).
- For smaller children who can't cooperate, the parent can:
- Undress the child as described above.
- Pick up the child and weigh both parent and child togther.
- Have the parent weigh themselves separately and subtract the two numbers.